application-developer-training
Basics
In this chapter you will learn the basics of MORYX and how it helps you to set up a production.
Use Case
Your customer Pencilla Inc. produces pencils. The production needs prepared material - wooden slats and graphite - and consists of the following four steps:
- Assembling: Glue slats and graphite together and shape it.
- Colorizing: Add paint and imprint text
- Testing: Test if the pencil writes and if the colors are visible on paper.
- Packing: Pack each article in a box
Each step is executed on a separate workstation, where a worker has to follow instructions and may operate a machine.
For more information about pencil production, look here.
Setup
To setup a new project, you need the MORYX CLI installed. If you have installed
VisualStudio already, you would use dotnet tools:
$ dotnet tool install -g moryx.cli
Use moryx new to create a new MORYX application. It bootstraps a new C# solution
using the provided name and optionally takes additional parameters like --steps,
--products. Thus, it enables you to initialize everything you need in a single
command:
$ moryx new <NAME> --steps <LIST-OF-STEPS> --products <LIST-OF-PRODUCTS>
Considering Pencilla Inc. to apply MORYX to the whole factory, you decide to
use PencilFactory as the project name but it could also be a machine name, for
example. Optionally you can provide the steps and products already to the new
command. The products (GraphitePencil, made from Slat and Graphite) have already been
identified, but only GraphitePencil is needed so far.
Even though, there are four production steps, in the first iteration,
only the Assembling step should be covered by MORYX. These information result
in the following command:
$ moryx new PencilFactory --steps Assembling --products GraphitePencil
This should not only leave you with a solution PencilFactory.sln inside
the new folder PencilFactory. It also does some initial configuration
and ships empty databases.
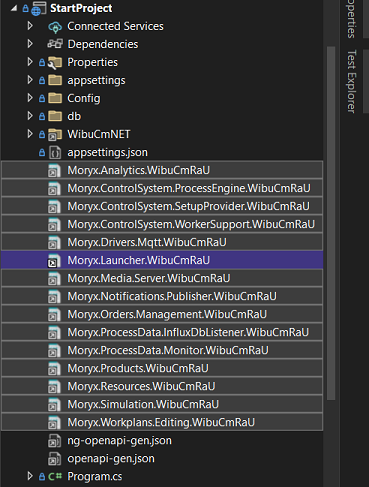
That means, you can directly open it in Visual Studio and dig into it. Before you run the app, you might need to install licenses.
Run the application (press F5).
Note Starting it for the first time will restore NuGet packages.That can take a few minutes.
Now that you have a running MORYX instance, you need to create some databases. To skip the UI here and speed things up, you’ll use the MORYX CLI again.
While the application is still running, moryx exec post-setup will create empty
databases and restart dependent modules. If your application runs on a different
host than https://localhost:5000, you can specify that by the --endpoint <URL>
option.
$ moryx exec post-setup
Products
At first, you will model products.
Products represent the articles to be manufactured. MORYX differentiates between
ProductType and ProductInstance. The ProductType is what you can order
in a catalog, while the ProductInstance is what you would receive after ordering:
an instance of the product with its unique serial number. In order for a ProductType
to be produced, it needs a corresponding ProductInstance. For further
information on how to create a product, see this.
Let’s take a look at the composition of the pencil Pencilla Inc. produces.
- A pencil consists of 2 wooden slats and 1 graphite in the middle.
- The pencil has a color (green or brown).
- Graphite can be in different degrees of hardness, in this scenario 2B, B and HB.
Note that, when defining the hardness of pencils, the number (degree) is put first (2B, 2H, etc.). Since this can’t be represented in code, it is switched for names, while for everything else the official format is used. If you are interested, you will find more about grading and classification here.
From the details above, the GraphitePencilType needs
- a color property
- a hardness property
You will find the GraphitePencilType among all other <Product>Types in the
PencilFactory package within the Products folder.
For properties to be shown in the UI, add the EntrySerialize attribute. For properties to be saved in the database, use the DataMember attribute.
public PencilColor Color { get; set; }

public GraphiteHardness Hardness { get; set; }
To make the code compile so far, you still need to implement the enums PencilColor and GraphiteHardness.
You can do that easily by moving the cursor to the red underlined name, press
Ctrl + . and select Generate class 'PencilColor' in new file. Then, go to
that file, change class to enum and add the required attributes:
public enum PencilColor
{
    Green = 1,
    Brown = 2,
}
Do the same for GraphiteHardness.
public enum GraphiteHardness
{
    [Display(Name = "B")]
    B = 1,
    [Display(Name = "HB")]
    HB = 2
}
Create Products
To create a product, you need to run the application now and head to the Products UI.
Click on the plus button to open the ‘Product Importer’ menu. This title may sound a bit confusing, but it lets you add new products.
Note The naming here comes from the fact, that you wouldn’t necessarily add products here, but ‘import’ them from other systems.
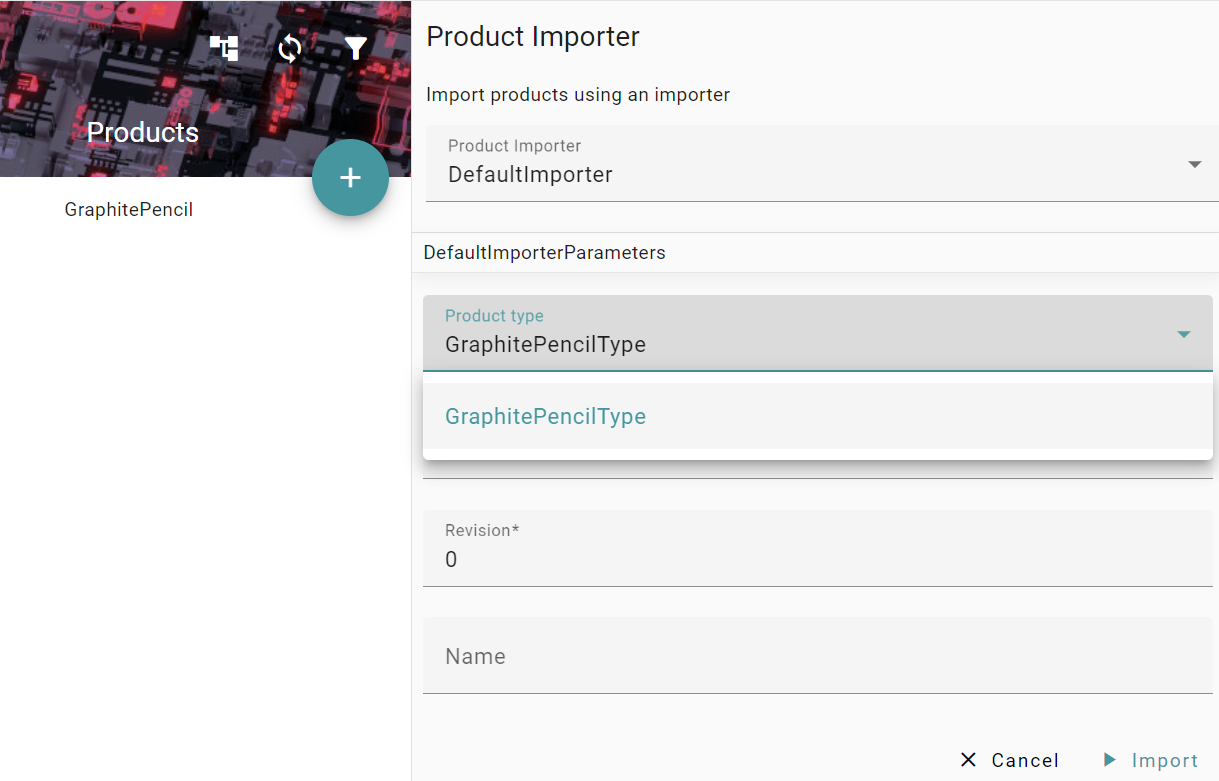
- Click on the ProductType dropdown and select GraphitePencilType
- Fill in the fields
- Identifier:
100001 - Revision:
0 - Name:
GP-1B
- Identifier:
- Click on Import.
- Click on the product you just added:
100001-00 GP-1B - Click on the edit icon at the top right to edit.
- In the
Colordropdown chooseGreen - In the
Hardnessdropdown chooseBas the hardness, which represents1Bin this case. - Save your changes by clicking on the save icon at the top right corner.
Repeat the same steps for a second product:
GraphitePencilType- Identifier:
100002 - Revision:
0 - Name:
BP-HB - Hardness:
HB - Color:
Brown
- Identifier:
If you did everything correctly, you should end up with something more or less similar to the image below.
Now you should have your products 100001-00 Brown Pencil GP-1B and
100002-00 Green Pencil GP-HB.
The next challenge is to actually let a resource produce the pencils. So far there is
no script that describes how the pencils are produced.
Therefore, the next step is to model a resource after which we can create a Recipe and a
Workplan.
Resources
We begin with modeling the assembling station, used to assemble the pencils. This is where resources come into play.
Resources represent physical assets and logical objects like robots or drivers
within a cyber physical system. They can be coupled with active devices or represent
passive objects like a table. The main advantage of this concept is that the
resource interface and implementation structure is the same for all resources.
So accessing a resource is done in an abstract and general way. Processing,
configuring and visualization of a resource is done in the same way with the
same classes. Extending a default resource can be done in a standard way and
includes expansion of the default UI as well.
Together with the customer you have figured out the following requirements as the first steps to digitalize their factory:
- They want to equip their assembling station with a screen
- The screen should display the instructions, a worker should follow
- When workers have finished a task, they click on the screen to confirm it
Based on these requirements
- The cell should display a workersupport screen to the worker
- Depending on the workers input (success, failure) the product either moves to the next station or goes into a scrap container
Add worker support
The AssemblingCell, which you will find in PencilFactory.Resources,
already has an instructor.
[ResourceReference(ResourceRelationType.Extension)]
public IVisualInstructor Instructor { get; set; }
IVisualInstructor
is the interface for a digital resource displaying the visual instructions on a
screen and requires workers to interact by pressing buttons.
ResourceReference
is an attribute that links two or more resources together. It’s a mechanism that
is used to save and load the source and the target relationship in the database.
You can start now to map the real world into digital twins using MORYX. As a recap, the following is planned for the pencil factory:
There should be one assembling station (cell), which will have a monitor to show instructions to a worker. So the following resources are needed:
- 1
AssemblingCell - 1
VisualInstructor
You will set up these in MORYX within the Resources UI by clicking the “+” button and selecting the required cell.
Note Make sure to deselect all cells before adding more, so that they will be added to the root level and not as children of other resources. Even though, that wouldn’t do any harm.
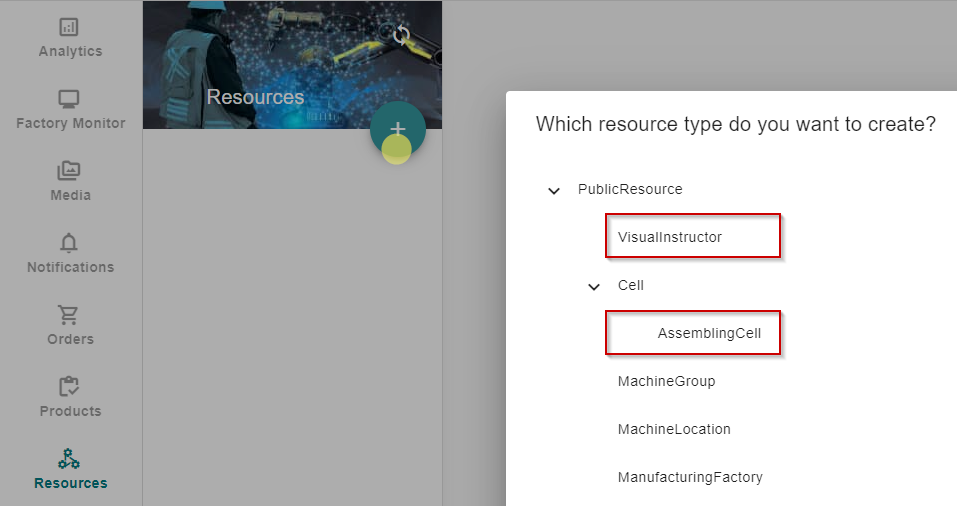
In the following dialog it is ok to go with just the typename as the cell identifier.
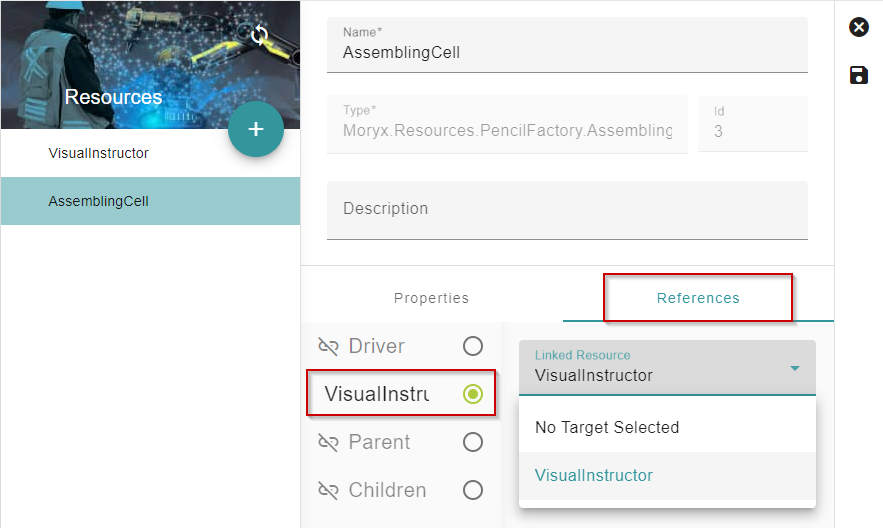
If you then select the AssemblingCell and click the edit button, you can assign the previously created VisualInstructor to its Instructor property.
Sessions
Cell and Instructor are now connected, but they do not interact with each other. Therefor, you need to implement the cells session handling. But before you do, you will get a short introduction about how this works in theory and the vocabulary that is used within MORYX.
Sessions are considered the sum of all tasks a resource (in this case a cell) has to perform on a single product instance. A session may consist of multiple sequences, which contain a single activity.
While sessions and activities are represented by types, sequences are more of a concept.
Usually a session (and with it a sequence) is started by a resource, telling the process engine, that it is ReadyToWork.
Then with ActivityStart() the process engine can tell a resource, that it
should start working on a product. After the resource has finished its job, it
will signal this with ActivityCompleted().
When the process engine has processed the ActivityResult (submitted by ActivityCompleted),
it will “close” the sequence with SequenceCompleted().
Then, the resource could continue the current session (ContinueSession) with
another sequence or start a whole new session by signaling ReadyToWork.
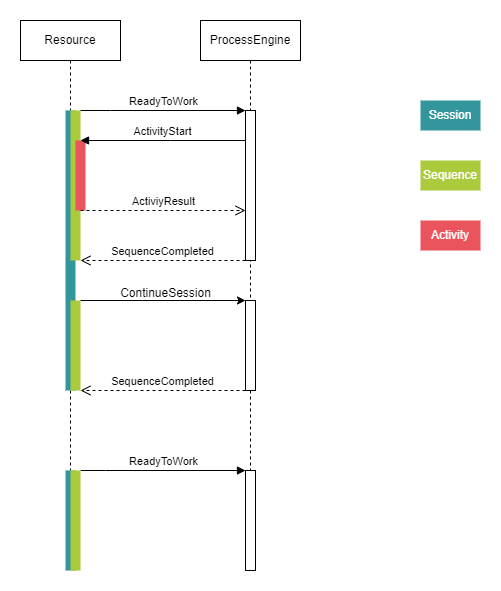
Now, you will convert theory into practice and begin with starting a session.
To do so, update the ControlSystemAttached() method to the following:
public override IEnumerable<Session> ControlSystemAttached()
{
    yield return Session.StartSession(ActivityClassification.Production, ReadyToWorkType.Push);
}
ControlSystemAttached() gets called in the event of the ControlSystem being
attached to the resource, which is, when the application gets started.
In here you will yield return a new session using Session.StartSession() and
thus signal ReadyToWork to the ProcessEngine.
ReadyToWorkType.Pullis used to retrieve an activity, that is assigned to the cell. If there is no activity, it would result in aSequenceCompleted(). This is typically used to start activities if a product is already ‘in’ a cell.ReadyToWorkType.Pushwon’t result in aSequenceCompleted(), but would ‘wait’ for an acitvity, like subscribing for push notifications.ActivityClassification.Productionis used to notify that the cell is ready to work on anActivityof typeproduction.
Since that should result in an ActivityStarted event, the next thing to
implement will be the ActivityStarted() function. Find the comment
/* Start execution here */ and replace it so that the whole function looks
like this:
public override void StartActivity(ActivityStart activityStart)
{
    _currentSession = activityStart;
    switch (activityStart.Activity)
    {
        case  AssemblingActivity activity:
            VisualInstructor.Execute(Name, activityStart, CompleteInstruction);
            break;
    }
}
That wouldn’t compile so far, because there is no CompleteInstruction right
now, which is provided as a delegate to Instructor.Execute. That means, you
have to implement CompleteInstruction(), that gets called, when an instruction
has finished, i.e.: When a worker has finished their task.
private void CompleteInstruction(int instructionResult, ActivityStart activity)
{
    var result = activity.CreateResult(instructionResult);
    _currentSession = result;
    PublishActivityCompleted(result);
}
These previous lines will complete the activity by publishing an ActivityResult
to the ControlSystem.
And finally, the method that gets called on a cell after completing work is
SequenceCompleted(). In here you start a ReadyToWork session again, using
PublishReadyToWork() and update _currentSession.
public override void SequenceCompleted(SequenceCompleted completed)
{
    _currentSession = completed;

    var rtw = Session.StartSession(ActivityClassification.Production, ReadyToWorkType.Push);
    PublishReadyToWork(rtw);
    _currentSession = rtw;
}
Start production
Create a Workplan
In order to produce pencils, you have to establish the connection between cells and products: MORYX needs to know, how a product flows through the production line. This is not done in the code, but modelled within Workplans.
This allows you to define in a rather abstract way, what needs to be done without going much more into details. MORYX will find the way later, how this is done for a running order.
Start the application, go to Workplans and click on the plus button.
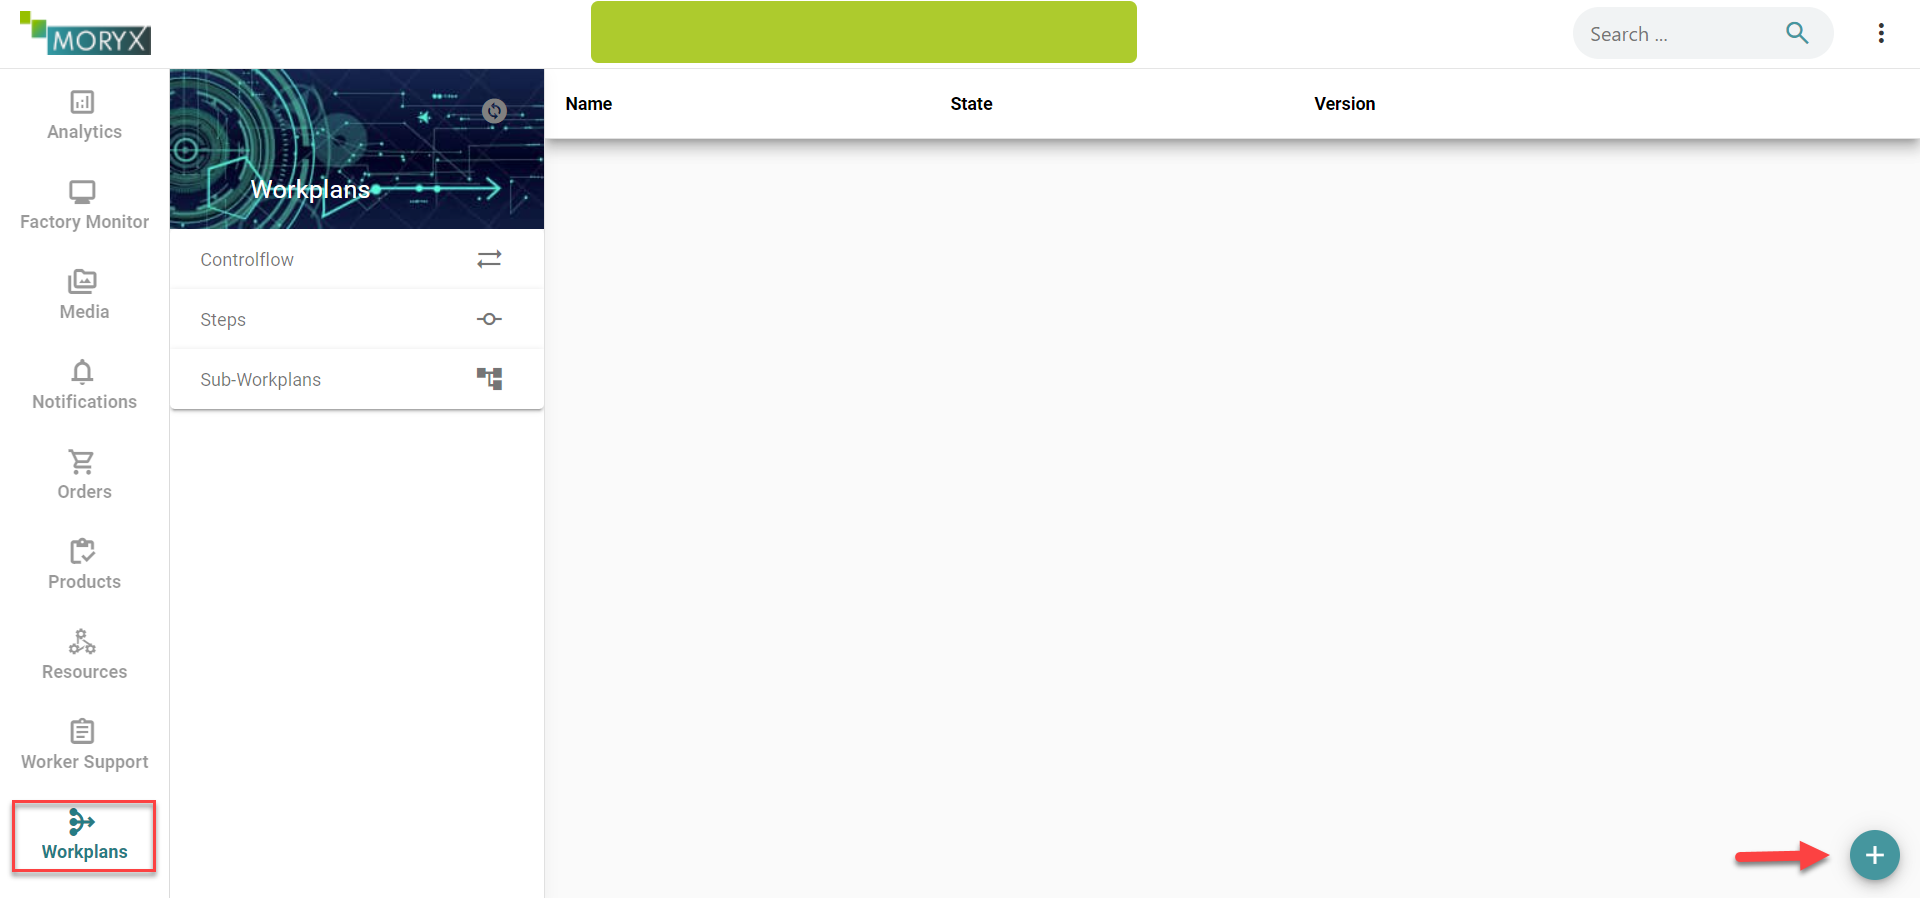
Drag an Assembling Task step to the workplan and connect the inputs and outputs.
The available Steps correlate to the code, that has been generated and was shipped together with the assembling resources.
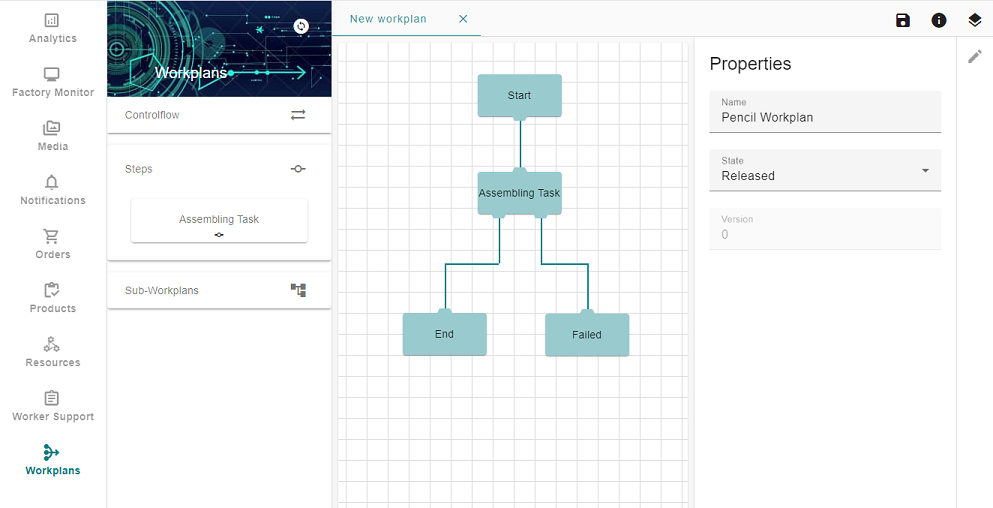
You want to configure the text that is displayed on the worker instruction.
Click on the Assembling Task step to edit it and configure it as shown in
the screenshot below. The text to put in could be Put the graphite into the slats and glue them together. Then cut the result into pieces and shape each of them. But could be
anything you want.
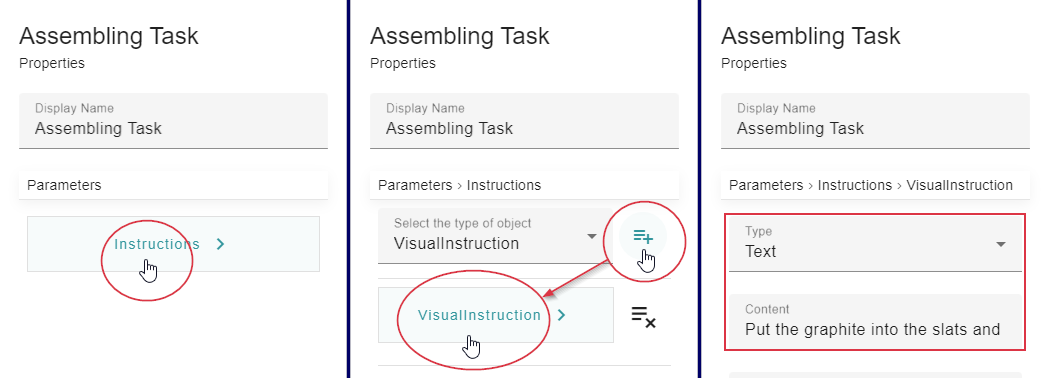
When you are done, modeling your workflow, you have to save the workplan.
Add a Recipe
In order to make the connection between a Product and the Workplan you just
created, you need a Recipe.
Go to Products and select the Product you want to produce, that is the GraphitePencil. Click on the Recipes tab and the edit button located on the top right corner. Click the Add Recipe button, located on the bottom left corner to add a new recipe.
- Select the ProductionRecipe, give the recipe a name
PencilRecipeand select your created workplanWorkplan.
- Click on Create for the recipe to show up in the products UI.
- For the recipe to be automatically selected when the product is produced, select
DefaultClassification. - Save your changes by clicking on the save icon located at the top right corner.
- Repeat the same steps for the second product
100002-00 Green Pencil GP-HB.
Start production
To create a new Order. Navigate to the Orders UI.
- Click on the add button at the bottom right.
Fill in the details of the Order:
- Order Number: ` 000001` .
- Operation Number: ` 0001`.
- Product: ` 100001-00 GP-1B`
- Recipe: ` Pencil Recipe`
- Amount: ` 5`
Click on the plus button to add this as an operation to the order. One order can have multiple operations, but this is not needed here. Click CREATE to create the order.
- Click on BEGIN to start the production of the order.
- Enter
1as thePartial Amount. - Then click on BEGIN to start the production.
Now the production is running!
That’s it, you should now be able to let the pencils flow through the assembling cell.
In order to see the visual instructions, go to the module Worker Support and select for VisualInstructor as Display
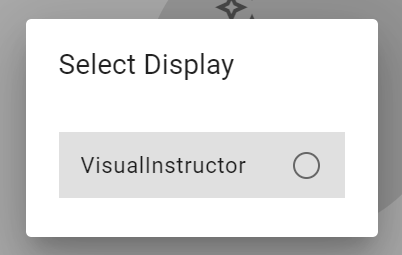
Use the SUCCESS and FAILED action to make the products flow through the production line
Troubleshooting
Here you will find a list of common problems, that might occur, and how to fix them.
Encountering WupiExceptions
WupiException: Der CmContainer-Eintrag wurde nicht gefunden, Fehler 200.
The application depends on MORYX modules, that are licensed. But no worries: They ship with developer licenses, that need to be activated:
- Open CodeMeter Control Center, which you should have installed beforehand through the CodeMeter User Runtime (Version 8.x)
- Drag & Drop the
.WibuCmRaufiles onto it
